Couch Cleaning Mistakes That Ruin Fabric (And How to Avoid Them)
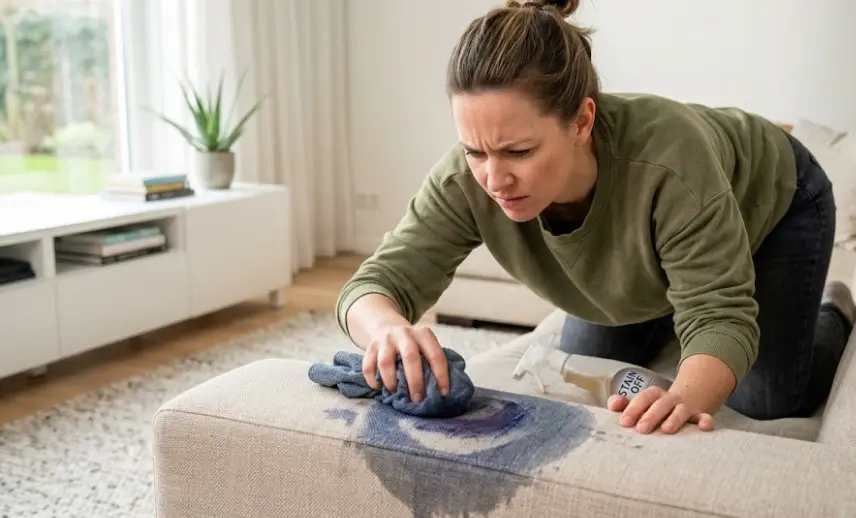
Most couch cleaning damage doesn't happen gradually. It happens in the first minute — before the person cleaning it has had a chance to think about what they're doing. A stain appears, there's an instinct to act immediately, and the wrong move makes a recoverable problem into a permanent one.
The mistakes that cause the most damage are remarkably consistent. They show up across different fabric types, different households, and different price points. Understanding them before something goes wrong is worth considerably more than learning them after.
Mistake #1: Rubbing Instead of Blotting
This is the one that causes more irreversible damage than anything else on this list. The reflex when liquid hits fabric is to grab a cloth and rub — which is exactly backwards from what works.
Rubbing does three things, none of them good. It pushes the liquid deeper into the fabric pile and into the foam fill beneath it, where extraction becomes significantly harder. It spreads the soiled area outward, turning a 5 cm stain into a 20 cm stain. And on fabrics with a directional pile — microfiber, velvet, corduroy — it physically disrupts the fiber alignment in the affected area, which can create a visible texture difference that persists even after the stain is gone.
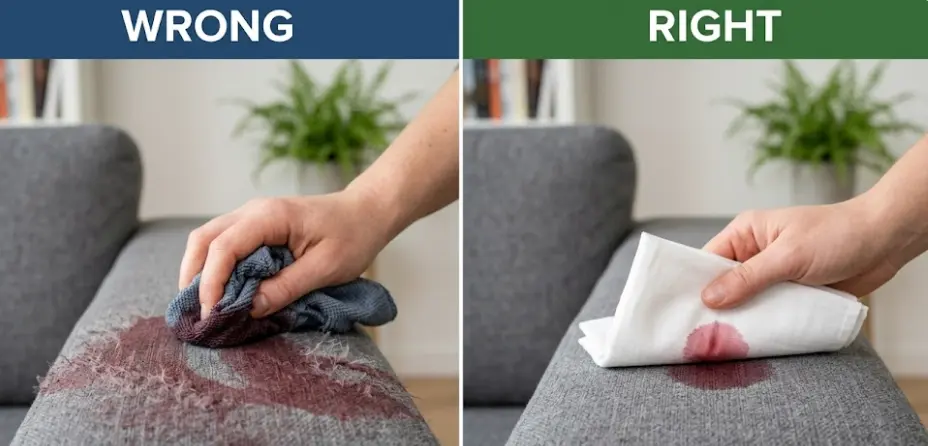
The correct motion is a firm blot: press a clean, dry white cloth straight down onto the spill and release. Straight down, no lateral movement. Replace the cloth as it absorbs liquid and repeat. On a fresh spill, this process alone — no product, just a dry cloth and blotting — removes a surprisingly large proportion of the liquid before it bonds to the fibers.
Mistake #2: Skipping the Cleaning Code
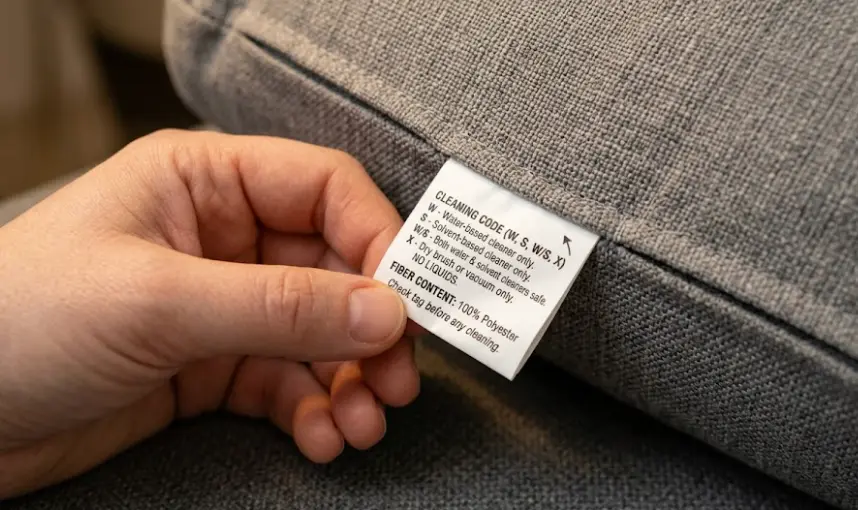
Every upholstered piece manufactured in the last 50 years has a small tag — usually under a seat cushion or along the bottom frame — with a letter code that determines what cleaning approach is safe. Most people have never looked at it.
| Code | Meaning | What goes wrong if you ignore it |
|---|---|---|
| W | Water-based cleaners safe | Usually fine — but over-wetting still damages foam fill |
| S | Solvent cleaners only. No water. | Water causes permanent marks, pile matting, fiber damage. Most commercial sprays are water-based. |
| W/S | Either is safe | Low risk — over-wetting still applies |
| X | Vacuum only, no liquid | Any liquid cleaning damages the fabric or backing |
S-coded fabrics are where the damage consistently happens. Cotton velvet, viscose, rayon blends, certain antique reupholstery fabrics — these are S-coded. Applying Resolve Fabric Cleaner, Woolite Upholstery Foam, or even plain water to an S-coded fabric causes water marks that are permanent. Professional dry solvent cleaning can reduce their visibility but rarely eliminates them entirely once they've set.
The tag takes 10 seconds to find and read. It is the single most useful thing you can do before touching your couch with any cleaning product.
Mistake #3: Using Hot Water on Stains
Cold water for fresh stains. Always. This is one of the most misunderstood points in DIY upholstery care, and it has a specific chemical reason.
Protein-based stains — blood, egg, dairy, sweat, pet urine — contain proteins that are water-soluble when fresh and cold. Heat denatures those proteins: the molecular structure unfolds and the protein bonds to the fabric fibers permanently. A blood stain treated immediately with cold water often comes out completely. The same stain treated with warm water becomes a gray-brown shadow that no subsequent cleaning fully removes.
This applies to anything that came from a living organism. If you're not sure what the stain is, treat it as protein-based and use cold water. The worst outcome of cold water on a non-protein stain is that it doesn't work as well as warm water would have. The worst outcome of hot water on a protein stain is permanent setting.
Mistake #4: Not Testing the Product First
Every cleaning product should be tested on a hidden area of the fabric before it goes anywhere visible. This is not optional caution — it is the step that prevents the most expensive outcomes.
The hidden test area: inside the back panel of the sofa if it has a removable cover, on the fabric on the underside of a seat cushion, or on the fabric behind a fixed back cushion where it won't be seen. Apply a small amount of the product, let it dry completely — not just feel dry, but fully cured — and check for color change, texture change, shrinkage, or tide marks.
Products that cause problems on hidden tests: some enzyme cleaners react with certain dyes and cause color lightening. Some solvent-based cleaners dissolve adhesives used in bonded leather. Some "all-fabric" sprays cause synthetic velvet pile to mat. None of these failures are predictable from the product label alone — the only reliable test is the hidden area test on your specific fabric.
The time investment is five minutes and one day of waiting. The alternative is discovering the same information on the center cushion of a sofa that can't be replaced.
Mistake #5: Mixing Vinegar and Baking Soda
This combination appears constantly in "natural cleaning" content online, and it is genuinely ineffective for upholstery — not because natural cleaning doesn't work, but because the two ingredients cancel each other out before they do anything useful.
Baking soda is a base (sodium bicarbonate, NaHCO₃). White vinegar is a dilute acid (acetic acid, CH₃COOH). When you combine an acid and a base, you get a neutralization reaction: the acid and base react with each other, producing CO₂ (the fizz), water, and sodium acetate. The fizzing looks like activity, but what's actually happening is that both cleaning agents are consuming each other instead of working on the fabric.
What you end up with after the reaction: wet fabric with a sodium acetate residue. Sodium acetate is a mild salt. It doesn't clean anything.
Mistake #6: Not Rinsing After Using a Cleaning Product
This is the most common explanation for "my couch got dirtier after I cleaned it." Cleaning products — even good ones — leave surfactant residue in fabric if they're not rinsed out. Surfactants are the active cleaning molecules; they work by surrounding soil particles and allowing them to be lifted away. When rinsing doesn't happen, those surfactant molecules stay in the fabric and continue doing what they do: attracting and holding particles. Dust, airborne grease, pet dander — it all sticks to the residue faster than it would stick to clean fabric.
The timeline: a sofa cleaned without rinsing often looks noticeably cleaner for two to three weeks, then deteriorates faster than it did before the cleaning. After a few months it can look worse than before treatment. The same sofa, properly rinsed, stays cleaner significantly longer.
The fix is simple but adds time: after applying and working in any cleaning product, follow up with a pass using a clean cloth dampened with plain cold water only. Blot to remove the product residue. Then blot dry. This step — which most DIY cleaning skips — is the difference between a clean sofa and one that gets dirty fast.
Mistake #7: Over-Wetting the Fabric and Foam
Consumer cleaning machines — handheld units, rental carpet extractors used on upholstery — introduce more moisture than they extract. The fabric surface may feel damp rather than wet, but the foam fill underneath absorbs and holds water for far longer than the fabric cover suggests.
Open-cell polyurethane foam — the standard fill in most upholstered furniture — wicks and holds moisture. In a dry environment with good airflow, a thoroughly wet 4-inch foam cushion can take 24 to 36 hours to dry completely. In Seattle's ambient humidity of 75–85% through autumn and winter, that timeline extends further. If the cushion is reassembled, placed back on the sofa, or sat on before the foam is dry, you've created ideal conditions for mold growth in an environment where you can't see or smell it for weeks.
The test before reassembling cushions: press a dry cloth firmly against the thickest part of the cushion for 30 seconds. If any moisture transfers, it's not done. Stand cushions on their edge during drying, not flat — edge positioning allows airflow to both faces simultaneously and cuts drying time significantly.
Mistake #8: Using Bleach on Colored or Patterned Fabric
Bleach removes color. On white fabric or colorfast materials with specific bleach-tolerance (Sunbrella solution-dyed acrylic is the notable exception), a diluted bleach solution has specific applications. On virtually everything else — any colored fabric, any patterned upholstery, any synthetic blend that isn't tested for bleach resistance — applying bleach removes dye from the fibers and creates a permanent discolored patch.
The specific mistake pattern: a mold or mildew stain appears on a sofa cushion. The person cleaning it reaches for bleach because that's what removes mold in bathrooms. The mold is gone. So is the color. The resulting bleach spot is permanent and cannot be re-dyed at home without professional reupholstery or dye injection.
For mold on upholstered fabric, enzyme-based cleaners (specifically formulated for mold, like Bac-Out) work without damaging dyes. They take longer and require adequate dwell time, but they leave the fabric intact.
Mistake #9: Spraying Product Directly Onto the Fabric
Most upholstery spray products are designed to be sprayed onto a cloth first, then applied to the fabric. Spraying directly onto the upholstery concentrates product in uneven pools — more product lands in some spots than others, which means those areas get more moisture and more cleaning chemistry than surrounding fabric. As it dries, this unevenness can create tide marks and splotchy appearance, particularly on light-colored or uniform-texture fabric.
The correct application method: spray the product onto a clean white cloth until it's damp but not dripping. Then apply the cloth to the fabric using a blotting or gentle circular motion. This gives you controlled, even product distribution across the surface. It uses less product, produces more even results, and dramatically reduces the risk of tide marks.
Mistake #10: Using a Stiff Brush on Microfiber
Microfiber upholstery has a distinctive texture — soft, suede-like, and directional. It also shows cleaning marks easily. A stiff-bristle brush used on microfiber during cleaning disrupts the fiber direction in the brushed area, leaving streaks or patches that look different in light from different angles even after the cleaning product has dried.
For microfiber specifically: use a soft-bristle brush (or no brush at all — a cloth works fine) during cleaning. After cleaning, while the fabric is still slightly damp, brush the entire surface in one consistent direction with a clean, soft-bristle brush. This step restores the uniform pile direction and eliminates the patchy look that dried microfiber often develops after wet cleaning. Do the whole section at once rather than spot-by-spot — treating only the stained area often leaves a visible edge where the cleaned area meets the undisturbed surrounding fabric.
Mistake #11: Treating the Fabric and Ignoring the Foam
The fabric surface of a sofa is what's visible, so it's what cleaning focuses on. But the foam fill is where a significant proportion of the contamination actually lives — particularly in households with pets or children, or in furniture that hasn't been professionally cleaned in several years.
Pet dander, fine particulate matter, body oils, and biological material work through the fabric pile over time and accumulate in the foam. Surface cleaning removes what's in the fabric itself. It doesn't affect what's in the foam. This is why a sofa that looks clean after DIY cleaning can still produce a musty smell when someone sits on it — the compression releases air from the foam, carrying contaminants through the fabric surface.
Professional truck-mounted extraction operates at sufficient pressure to drive solution through the fabric and into the foam fill, then extract it back. Consumer machines don't reach this depth. For furniture with established biological contamination — pet households, allergy sufferers, high-use pieces — this is the meaningful gap between DIY maintenance and professional cleaning.
Mistake #12: Waiting Too Long to Act on a Spill
The window for effective fresh stain treatment is roughly 15–20 minutes. Within that window, most water-soluble spills — wine, coffee, juice, most food — can be largely removed with cold water and blotting alone. After 30–60 minutes, the liquid has begun to bond with the fabric fibers and the stain becomes progressively more difficult to treat with consumer products. After 24 hours and full drying, many stains require professional extraction with chemical pre-treatment to address effectively.
The practical implication: keep a clean white cloth and cold water accessible in the rooms where the sofa lives. The response to any spill on a W or W/S coded sofa is immediate blotting with a dry cloth first, then cold water applied sparingly and blotted. No product needed in the first 15 minutes for most spills — mechanical removal of the liquid before it bonds is almost always more effective than any chemical treatment applied later.
1. Blot immediately with a dry white cloth — press firmly, no rubbing.
2. Check cleaning code tag before applying anything wet.
3. If W or W/S coded: apply cold water sparingly to a cloth, blot from outside in.
4. Rinse with a clean damp cloth.
5. Blot dry and leave uncovered to air dry completely.
If the stain remains after this: call a professional rather than applying more product. Additional DIY treatment on a bonded stain usually makes professional removal harder.
When DIY Goes Wrong: What Can Still Be Fixed
Some cleaning mistakes are recoverable — knowing which ones matters before deciding to try additional treatment or call a professional.
Often Recoverable
- Surfactant residue from insufficient rinsing — a rinse pass with clean water, then professional extraction if needed, resolves most residue cases.
- Tide marks on polyester or synthetic fabric — professional extraction of the whole section with feathered edges, not just the marked area, resolves most tide marks on W-coded synthetic fabric.
- Stiff or crunchy texture after cleaning — usually product residue; a clean water rinse pass and thorough drying restores the texture.
- Microfiber streaking from stiff brush use — re-wet slightly with a fine mist of water, brush the whole section in one direction while damp, allow to dry uniformly.
- Mild mold from over-wetting, caught early — professional extraction and enzyme treatment within the first few weeks of mold development often resolves it without foam replacement.
Usually Permanent
- Water marks on S-coded fabric (viscose, cotton velvet) — the fiber structure has changed at a molecular level. Professional solvent cleaning reduces visibility but rarely eliminates.
- Bleach discoloration — dye has been removed from the fibers. Cannot be reversed without professional re-dyeing or reupholstery.
- Heat-set protein stains — hot water or steam applied to blood, urine, or dairy stains bonds the protein permanently. Significantly harder to remove than fresh treatment would have been.
- Pile damage from rubbing on velvet — physically disrupted fiber tips cannot be straightened once set.
- Established foam mold — mold that has been growing in foam fill for 2+ months typically requires foam replacement rather than cleaning.
Frequently Asked Questions
Rubbing instead of blotting — it drives liquid deeper into the fabric and foam, spreads the stain outward, and damages the fiber direction on microfiber and velvet. The correct motion is always a firm vertical blot with a dry white cloth, pressing straight down without any sideways movement. The second most common mistake is applying water-based products to S-coded fabrics (cotton velvet, viscose), which causes permanent water marks.
Not together — they neutralize each other on contact, producing CO₂ fizz and leaving sodium acetate residue in the fabric. Used separately, both have limited uses: baking soda absorbs surface odors when applied dry and vacuumed off, and diluted white vinegar works on some odors on W-coded fabrics. Neither removes embedded soiling or protein stains, and neither replaces a proper cleaning product matched to your fabric type.
Yes — for protein-based stains (blood, dairy, egg, sweat, pet urine). Heat denatures the protein molecules and bonds them permanently to fabric fibers, making the stain significantly harder to remove than a fresh cold-water treatment. Always use cold water as a first response to any unknown stain. Hot water is only safe in professional extraction systems where temperature, pressure, and immediate removal are all controlled simultaneously.
Check the cleaning code tag — under a seat cushion or along the bottom frame. W means water-based cleaners are safe. S means solvent cleaners only (no water). W/S means either. X means vacuum only. Always test any product on a hidden area first and let it dry completely before applying to visible fabric. If the tag is missing, contact a professional before using any liquid cleaner.
Most likely cause: surfactant residue from cleaning product that wasn't rinsed out. It stays slightly sticky in the fabric and attracts dust and debris faster than clean fabric would, causing rapid re-soiling and sometimes an uneven appearance after drying. Other causes: tide marks from uneven moisture application, or pile disruption from rubbing on microfiber or velvet. A follow-up rinse pass with plain cold water resolves most residue cases.
Only on W-coded synthetic fabrics, with the steamer kept 10–15 cm from the surface and moving continuously. S-coded fabrics (cotton velvet, viscose, rayon) must not be steamed — the moisture and heat combination causes permanent fiber damage. Leather and faux leather should not be steamed either. Steam only reaches the fabric surface; it doesn't address contamination in the foam fill where biological matter accumulates.
Professional Upholstery Cleaning — Seattle Area
When DIY cleaning has caused damage — or when you'd rather not risk it — Fresh Furnish Cleaners covers Bothell, Woodinville, Kirkland, Redmond, Bellevue, Seattle, Everett, Edmonds, Lynnwood, Shoreline, Sammamish, and surrounding communities.
See our full furniture and upholstery cleaning services • Satisfaction guaranteed
Related Guides
Professional vs. DIY Upholstery Cleaning
When DIY makes sense, when it doesn't, and what separates a $40 rental machine from professional truck-mounted extraction.
Read ComparisonHow to Identify Your Upholstery Fabric
Find the cleaning code tag, understand W/S/X codes, and know exactly what your fabric can and can't handle before any cleaning attempt.
Read Fabric GuideVelvet Sofa Cleaning: Why DIY Can Ruin It
The specific damage DIY cleaning causes to velvet — water rings, pile crushing, and why they're often permanent on cotton and viscose velvet.
Read Velvet Guide